Part 3: Having an encrypted internet connection from anywhere
How to setup and use SSH
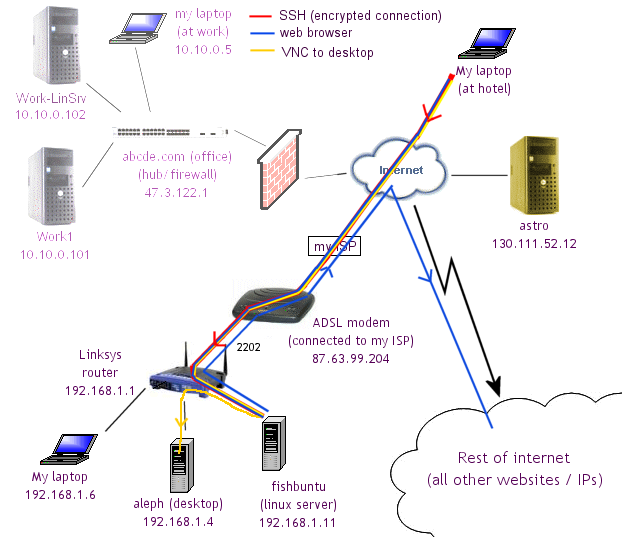
We want to set things up so that we can connect as in the following diagram.
If you have a dynamic IP address, you'll also have to read the next section.
You need to
(a) Set up Public Key Authentication
(b) Configuring Putty - changing default settings (optional)
(c) Configuring Putty - sessions and tunnels
(d) Forcing SSHD to use Public Key Authentication
(e) AutoIt script to handle dynamic IP addresses
(f) Example of everything working
(a) Setting up public key authentication
It is possible to use SSH just with login passwords but it is much more secure to make a public-key/private key pair. The public key goes on the server (that you are trying to connect to). The private key goes on the client (where you are connecting from).
In terms of Windows programs, it is simplest to use Puttygen (which is in the same folder as Putty):
 Do the following:
- Select the parameters to make a key that is SSH-2 protocol, RSA type, and 2048 bits long (or longer).
- "Click generate"
- Add in a comment
- Add in a passphrase
Make sure that you have a good passphrase. Long enough and not something that someone can guess by learning part of your phrase (e.g. not "thank God it's Friday"). - Save the public key (e.g. "halon"). I always change the extension to .pub (e.g. "halon.pub")
- Save the private key (e.g. "halon.ppk")
- Now select the Public key
(and save it as a text file)
- On the Linux server, in your home folder ($HOME) make a directory called .ssh
- Save the public key (that
you copied above) into .ssh/authorized_keys file (it must be one line, word wrapped).
Note: if there is already an authorized_keys file,
then just append this to the end of it (on a new line of course).
- Your private key is saved where ever the SSH client program is run from. If you are just using a Windows laptop/USB drive, then it is already saved in the same folder as Putty. The public key must be put on the destination computer.
If you are going to run SSH from your linux server to connect to somewhere else, you'll need to put your private key on your server (in the file .ssh/id_rsa) and the public key on the remote server that you will be connecting to. It might be important to have a separate private key for the server. For example: if I have one private key for my laptop to connect to Fishbuntu, should I have a separate private key to connect from Fishbuntu to Astro?
A linux server requires the public and private keys in OpenSSH format. The public key is easily done as seen above. You can either convert the private key from puttygen to OpenSSH format (see the conversions menu in PuttyGen) and then paste that in to .ssh/id_rsa or you can generate your own private/public key pair on the server using "ssh-keygen" in OpenSSH.
(b) Set up Putty -- changing the defaults (optional)
First fix up the default settings. These will be used as the defaults for all future profiles so you want to get Putty looking just how you want it to.
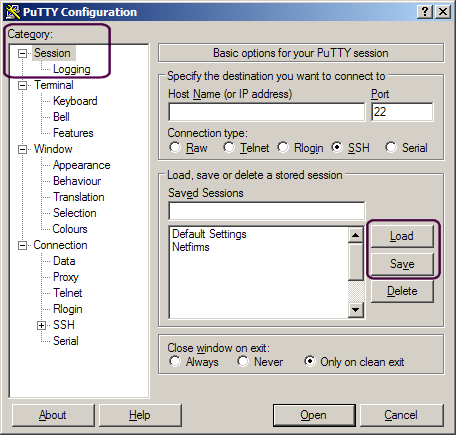
Note the categories in the list on the left side. The "Load" and "Save" buttons only appear when you've clicked on the "Session" category. Click on the categories listed below, and change the settings, then click back on the "Session" category and press the "Save" button. This will save the Default Settings (as long as there is no name in the "Saved Sessions" field).
You can see that I have another session saved called "Netfirms".
Change the following settings: (I got them from a page similar to this one and tweaked them a bit.
Category: Session
Connection type: SSH
Close window on exit: Only on clean exit

Category: Window
Columns: 100
Rows: 50
Lines of scrollback: 4000
Reset scrollback on keypress: Checked
Reset scrollback on display activity: Unchecked

Category: Window > Appearance
Font: Lucida Console, 11-point
Font quality: ClearType
Gap between text and window edge: 4

Category: Window > Translation
Character set: UTF-8
Handling of line drawing characters: Unicode

Category: Window > Selection
Action of mouse buttons: xterm (Right extends, Middle pastes)
   * or
Action of mouse buttons: Windows (Middle extends, Right brings up menu)
   * Basically it is dangerous to have Right=paste.
Paste to clipboard in RTF as well as plain text: enabled

Category: Window > Colours
ANSI Blue: Red:74 Green:74 Blue:255
ANSI Blue Bold: Red:140: Green:140 Blue:255
   * You can also change your default foreground and backgrounds. I use the following (light gray on black):
Default Foreground: Red:187 Green:187 Blue:187
Default Bold Foreground: Red:255 Green:255 Blue:255
Default Background: Red:0 Green:0 Blue:0

Category: Connection > SSH
Preferred SSH version: 2 only

Category: Connection > SSH > X11
Enable X11 forwarding: enabled
Note: you can change many of the setting while you are connected, but for some reason this freezes the SSH connection and may reset it.
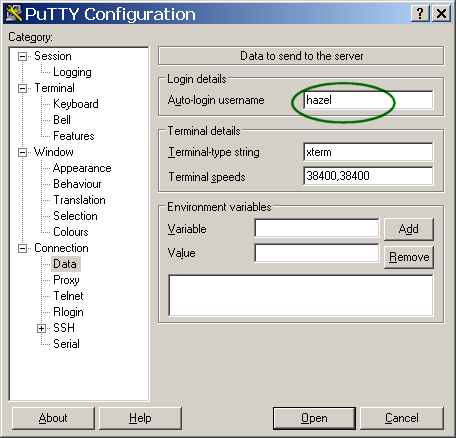
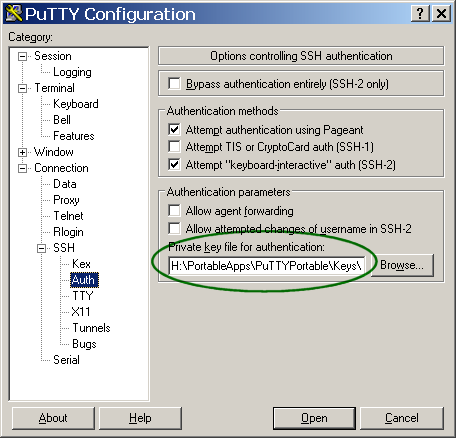
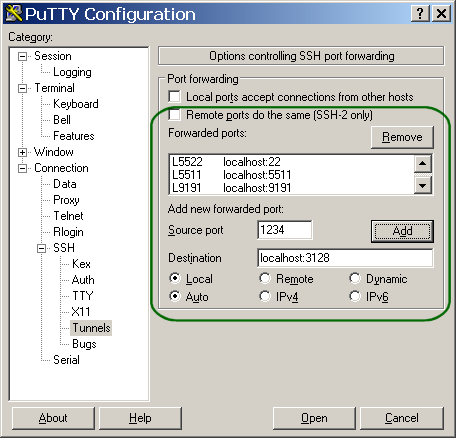
(c) Configuring PuTTY - sessions and tunnels
You need to modify all of the sections circled in dark green:
- Enter the hostname and the port.
When you've finished the other 3 screens, come back to screen 1 and press "Save"
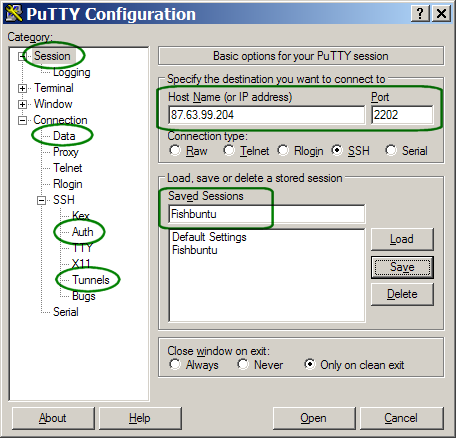
- Enter your login name:
- Enter the path and name of your private key file (e.g. halon.ppk).
- Set up your tunnels (see table in part I for details).
- Now click on the "Session" category, and then click the "Save" button.
You can make another profile with different tunnels, etc. using the same method. Just name it something else. Type the name into the "Saved Sessions" field before you hit the "Save" button.
(d) Fix up the sshd configuration file
Testing:You now need to test to make sure that PuTTY works and that you can connect by typing in a passphrase. Just click on the "Load" then "Open" buttons, to start the PuTTY session (to Fishbuntu). You can also double-click on the session name "Fishbuntu". When you type your passphrase in, you'll be at a Linux command line prompt. If you press <ENTER> instead of typing in a passphrase PuTTY will ask you for a password (until we prevent this - see below).
Once you have tested loging in using your Private Key (passphrase) you should configure sshd_config to only allow public_key logins (no passwords). This means that from now on you must have your private key in order to access the server or else you have to be at the console. We do this for improved security; random people cannot just try and guess your password and then take control of your server. They also have to have your private key file. Recall, the other simple, but valuable security policy that we did in section 2 was to change the SSH port from 22 to some number above 1024.
| Edit sshd_conf and make the following changes: |
| sudo vi /etc/ssh/sshd_config # Change to no to disable tunnelled clear text passwords # set to NO only when you have public key access set up #PasswordAuthentication yes PasswordAuthentication no |
| Restart ssh daemon to make any config changes take effect. Type in the following: |
| sudo /etc/init.d/ssh restart |
(e) Using AutoIT to make an automatic connection
You only need to read this section if you have a dynamic IP address.
| Put the following script into a file. I'll call it ssh-tunnel.au3 |
| ;ssh_Tunnel. AutoIt script ; $IPcurr is the current IP. $IPnew is a new IP if it has changed. ;set options ;Opt("RunErrorsFatal", 0) ;1=fatal, 0=silent set @error ;Opt("TrayIconHide", 1) ;0=show, 1=hide tray icon -- this doesn't work for pageant $progspath = @WorkingDir ; **** Assume that everything is in this directory ;---- ; first get the latest ip address (and store it in a file) ; should it wait??? shellexecutewait($progspath & "\curl\curl.exe", "-q mysite.com/myip.num -o myip.num",$progspath) ; read the two keys (old IP address and new IP address) $file = FileOpen($progspath & "\myip.txt", 0) ; read mode $IPcurr="" ;initialize in case it can't be read. If $file <> -1 Then ; if no errors then $IPcurr = FileReadLine($file) FileClose($file) EndIf $file = FileOpen($progspath & "\myip.num", 0) $IPnew="" ;initialize in case it can't be read. If $file <> -1 Then $IPnew = FileReadLine($file) FileClose($file) EndIf ;---- ; check if the IP address has changed. If so, write the new one. if $IPnew <> $IPcurr and $IPnew <> "" then $file = FileOpen($progspath & "\myip.txt", 2) ;erase prev. contents; write mod FileWriteLine ($file,$IPnew) $IPcurr = $IPnew FileClose($file) endif if $IPcurr = "" then msgbox(4096,"", "There is no IP address saved and I can't find the new IP address") beep(1000,100) beep(1100,100) beep(1200,100) exit endif ;* problem: what happens when the tunnels are updated? -- these lines must be updated too. filechangedir(".\putty") ;needed for .ppk files (public keys) $ans = msgbox (4+16,"USER?","Logon as NORMAL user?",3) ;if it times out ans=-1 6=YES, 7=NO if $ans = 7 then Run($progspath & "\putty\putty.exe -v -X -ssh gia321@"& $IPcurr & " -P 2203 -i .\keys\somefile.ppk -L 1234:localhost:3128 -L 5000:192.168.1.4:5900 -L 9191:localhost:9191 -L 5511:localhost:5511 -L 5522:localhost:5522") else Run($progspath & "\putty\putty.exe -v -X -ssh rubio@"& $IPcurr & " -P 2203 -i .\keys\halon.ppk -L 1234:localhost:3128 -L 5000:192.168.1.4:5900 -L 9191:localhost:9191 -L 5511:localhost:5511 -L 5522:localhost:5522") endif exit |
Now make a shortcut that starts AutoIt with the parameter
SSH-tunnel.au3 , as shown in the figure below.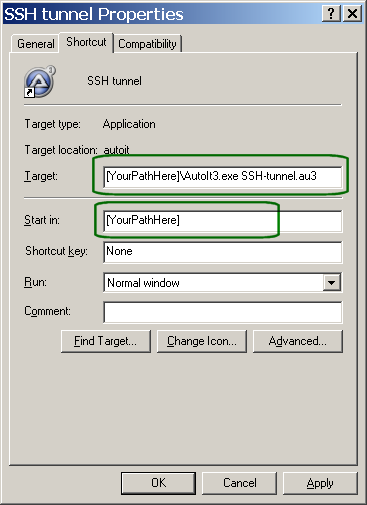
|
Notes:
|
| E:\Network contains autoit3.exe and SSH-tunnel.au3 | +--\curl +--\putty +--\TightVNC |
(f) Using Putty to connect and tunnel
Assume that you have set PuTTY up to connect to your home server and that you have the following tunnels (where 192.168.1.4 is the IP of your home desktop):
ssh rubio@87.63.99.204 -P 2202 -i \path\myprivatekey -L 5000:192.168.1.4:5900 -L 1234:localhost:3128
1. You either run PuTTY and connect it, or else run the shortcut to ssh_tunnel.au3 (if you have a dynamic IP) to make the connection to your home server.
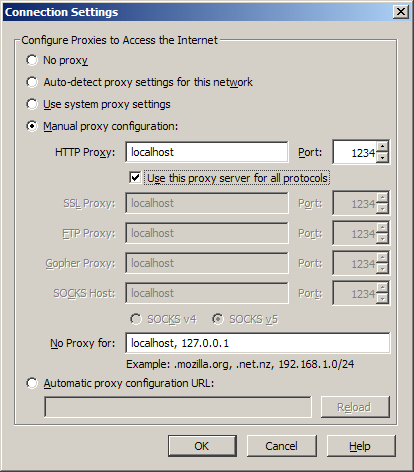
2. Set Firefox to use your tunnel and you can now browse securely from anywhere (everything is encrypted and routed through your home server):
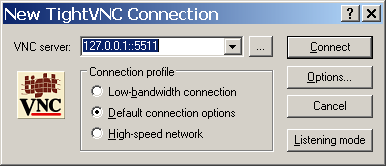
3. Run VNC and type this in, and you'll be connected to your home desktop (assuming that you have TightVNC running as a service on your desktop
and that it is listening on port 5900). You can now access your home desktop as if you were sitting right there.